Getting started
1 - Set Up your Missinglettr Workspace
2 - Connect your Social Media Account
3 - Connect a Content Source
4 - Set up branding for your campaigns
5 - Set up Schedule Templates
6 - Set up Dates and Times for my posts
What is Missinglettr?
Campaigns
Author specific campaigns
Creating and editing content templates
Customize the font for your branding
Customizing Quote Bubbles
Edit an Active campaign
General Settings
How to choose which page or group Missinglettr should send your campaign to
Image guidelines for campaigns
Manual Campaigns
Media assets download
Regenerate a campaign
UTM Parameters support
What is a campaign?
What will happen to my schedule if I pause and then re-approve a campaign?
Which URL shorteners can I use for my campaigns?
Why do most of my posts use the first time slot?
Social media
General
Character limits for different platforms
How to delete a social profile
Which social media accounts can I connect?
Why am I being asked to reauthenticate my social profile?
X
Having problems connecting to Facebook?
I can't connect my Facebook GROUP
I've connected my Facebook PAGE, but nothing is posting
My Facebook timeline is not available for selection
My plain text Facebook post is being published with a link
Medium
Having problems connecting to LinkedIn ?
How to reauthenticate LinkedIn
My LinkedIn company pages are not available for selection
Problem connecting to LinkedIn
Bluesky
Mastodon
Let's get technical
Integrations
Connecting your RSS feed to Missinglettr
Content from my blog posts aren't being extracted
How Google Analytics treats our shortened URLs
How to add your Youtube channel
No content found for a campaign ? Here’s how you can help us recalibrate your webpage
Setup an RSS feed
What's an RSS feed?
Sites
Can I change permissions for my team members?
How can I add/remove team members?
How to add a site
How to remove a workspace
My site's URL isn't being recognized
Security
Payments and billing
Common Questions
Does Missinglettr work with languages other than English?
How long will I wait for a response from Customer Support?
I have a feature suggestion, where can I submit it?
I want to exercise my rights under GDPR
Is Missinglettr GDPR compliant?
Which blogging platforms does Missinglettr work with?
Affiliate
Curate
Curate Auto-Schedule
Curate Quality Guidelines
Do you guarantee a minimum number of shares via Curate?
How likely is it that my Curate content will be shared?
Why is Curate reporting a problem loading my URL?
Analytics
Video Presentation
How to create Drip Campaigns ? [VIDEO]
How to use Curate [VIDEO]
How to use the Analytics [VIDEO]
How to use the Calendar [VIDEO]
How to use the Dashboard [VIDEO]
Tips and tricks for campaign creation [VIDEO]
CreateAI
Table of Contents
- All Categories
- Getting started
- How to create campaigns
How to create campaigns
After you’ve set up your account and specified your branding, you can now start creating and scheduling campaigns with Missinglettr.
First of all, here's what we mean by "campaign".
You can access your Campaigns from the left-hand menu. Once you navigate to Campaigns, you’ll see three columns:
- Drafts
- Active
- Completed

When you first connect your site, Missinglettr will detect your past blog posts as well (if your RSS feed allows).
The Drafts tab contains all your campaigns waiting for approval. That means Missinglettr has detected your article and developed a drip campaign for it. You can click Review Campaign to edit and approve content. Regenerate Campaign will develop a new campaign from the source URL — use this if you’ve made updates to your blog since first publishing.
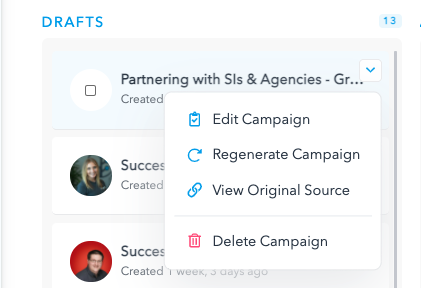
You can also View the Original Source for each campaign and Delete any you don’t want to use.
Reviewing a campaign means you have full control over what is posted to your social media accounts. There are four simple steps in this process.
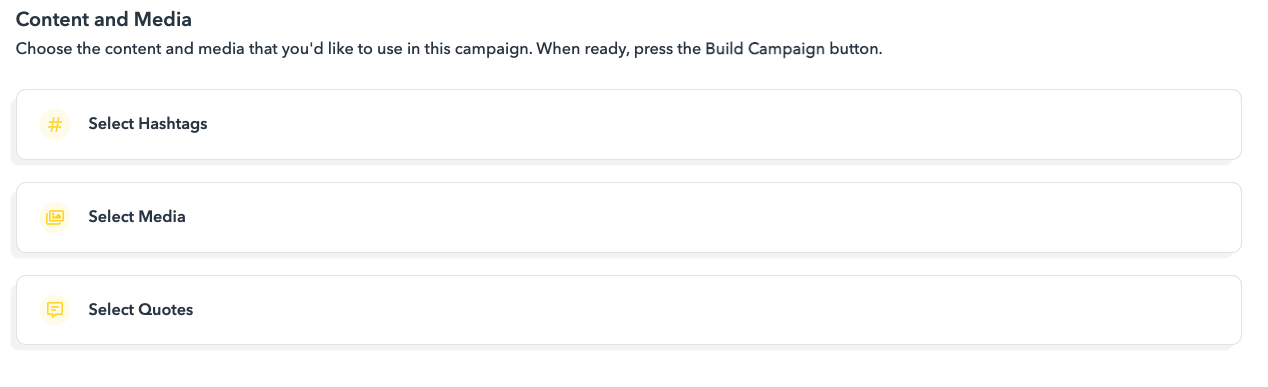
First, make sure you like the hashtags Missinglettr has picked in the Select Hashtags Section. You can add your own or turn them off altogether. Moving a hashtag higher in the list increases its priority for being assigned to posts. Once you are happy with hashtags, navigate to the Select Media tab.
Moving to the Select Media tab will allow you to review the images that have been auto-pulled from your URL as well as upload additional images and delete any you don’t want to be included. From there, move on to Select Quotes.
Here, you’ll be able to preview the quotes we’ve automatically pulled as well as add and delete them.
After you’ve reviewed each of the three tabs, you can move on to developing your posts by selecting Build Campaign. You can also jump straight to this if you don’t want to review post content before it’s built.
Here, you’ll be able to click through each of the developed campaign posts. When editing a post, you are given the possibility to edit the text of the quote image, text of the content, the assigned short links, hashtags, and your images. Use the arrows at the top right to move through each of the campaign posts.
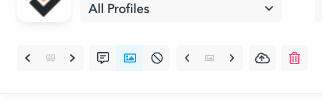
The quote icon allows you to cycle through selected quotes. The quote and image buttons allow you to toggle between using quote images and blog images. Next to that, you can also select not to add any images or upload a new image. The trash can icon will delete the post for that day.
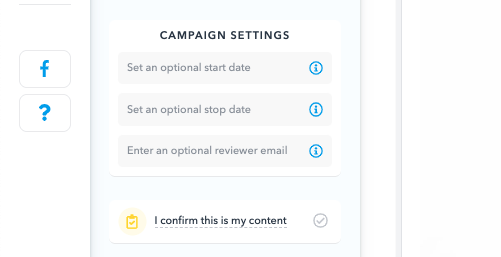
Just a few last steps before your campaign is live! You can set optional start and end dates as well as elect to receive an email reminder. You must confirm campaign content is your own, then you’ll be able to select Launch Campaign.
At any time, you can pause or cancel active campaigns from your Campaign page.
Next: How to determine the schedule for my campaigns?
Further Reading
How Often Should You Post on Social Media?